How to make AI Generated Video: Quick and Easy Guide!

Shreshtra - October 14, 2023 - Leave your thoughts. 13 min read
In this rapidly evolving landscape of technology, there is no doubt that AI(Artificial Intelligence) has emerged as a powerful tool, reshaping the way we create and consume content. From revolutionizing healthcare with improved diagnosis to self-driving cars to more immersive virtual reality experiences, AI has been gaining popularity worldwide, enriching people’s lives.
One remarkable facet of AI’s potential is its ability to generate videos. This has opened up a world of possibilities for filmmakers, content creators, and businesses.
This entire AI video creation topic can sound scary or complex to beginners, but I can assure you that this is not the case.
The fact that you have clicked on this article already shows your curiosity about AI video creation and how to make one! So let’s not waste any time and learn how to make AI generated video.
Note: If you are someone who prefers videos to blogs, don’t worry, we've got you covered. I have included a video tutorial on how to make AI generated videos. So, check it out!
Or, if you prefer an in-depth textual guide, then go ahead and read this article. Here, we will go step by step into creating AI generated videos using Animaker.
With just these three steps, we will have an AI generated video ready. This is going to be a fun ride, so let’s begin.
Step 1: Create the script
Creating the script is an essential step toward making a video. It is like flour to a cake - the very first ingredient. However, creating a script can be a time-consuming process. But thankfully, we can utilize the help of AI tools to make a script in seconds.
Here, we will make use of ChatGPT to create a script.
If you’re unfamiliar with ChatGPT, let me give you a brief introduction to this tool. ChatGPT is an AI tool that can hold conversations and assist you with tasks like generating prompts for an essay or composing emails. (Psst..It can do much more than just that.)
Let us see how to use ChatGPT to create a script for the video.
First, open the ChatGPT tool in your browser.
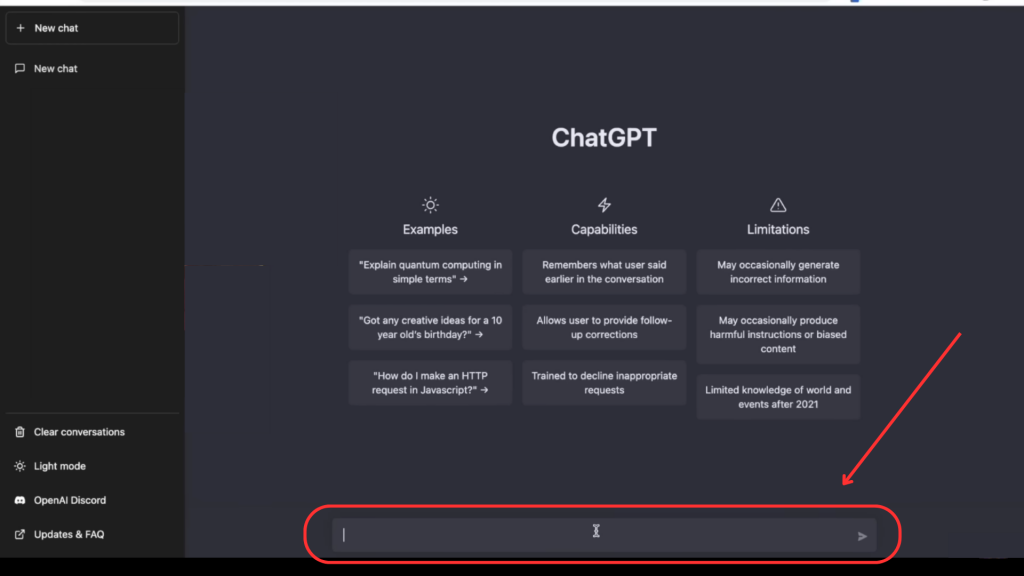
We need to first decide on a topic to request the AI to generate a script for us. I chose the topic “3 Fascinating Facts that You Never Learned in School”.
If you want to get tailor-made scripts, then you can ask ChatGPT to take up a specific role and generate a script accordingly. For example, you can ask ChatGPT to act as a researcher, author, teacher, etc., and generate scripts for you.
I am going to ask ChatGPT to act as a YouTuber and generate a script for my topic.

Within seconds, the AI tool generates a script for the video.
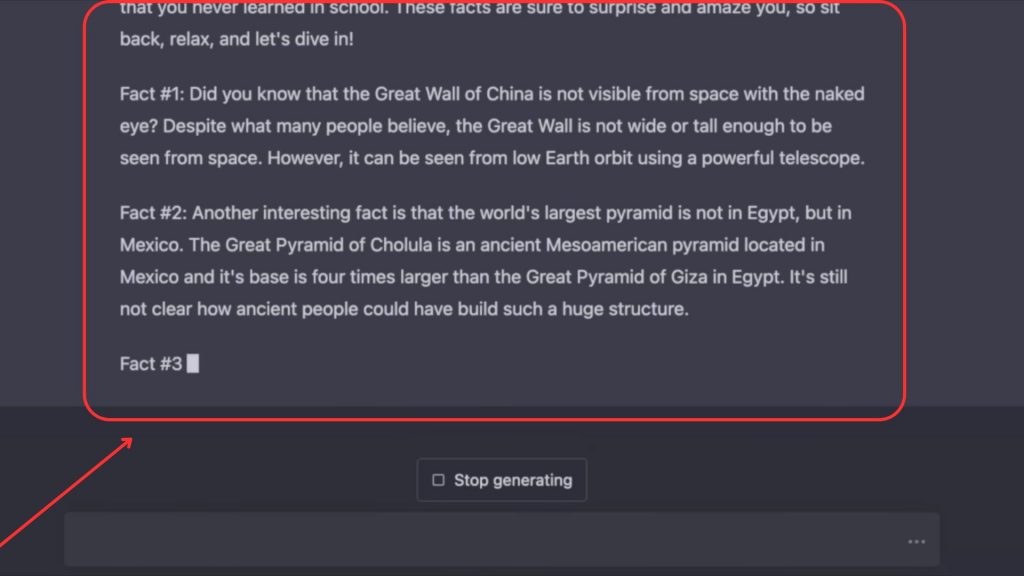
All it took was a couple of queries, and the script was ready. Let us move on to creating the video. Yay!
Step 2: Create the video
In this step, we are going to see how to create the video by adding various elements to it. Let’s look at them one by one.
- Create animated characters
- Add background to video
- Add voiceover to the character
- Add properties
- Add transitions
- Add music
- Add subtitles
1. Create Animated Characters
Before creating the video, let us first create the character using Animaker.
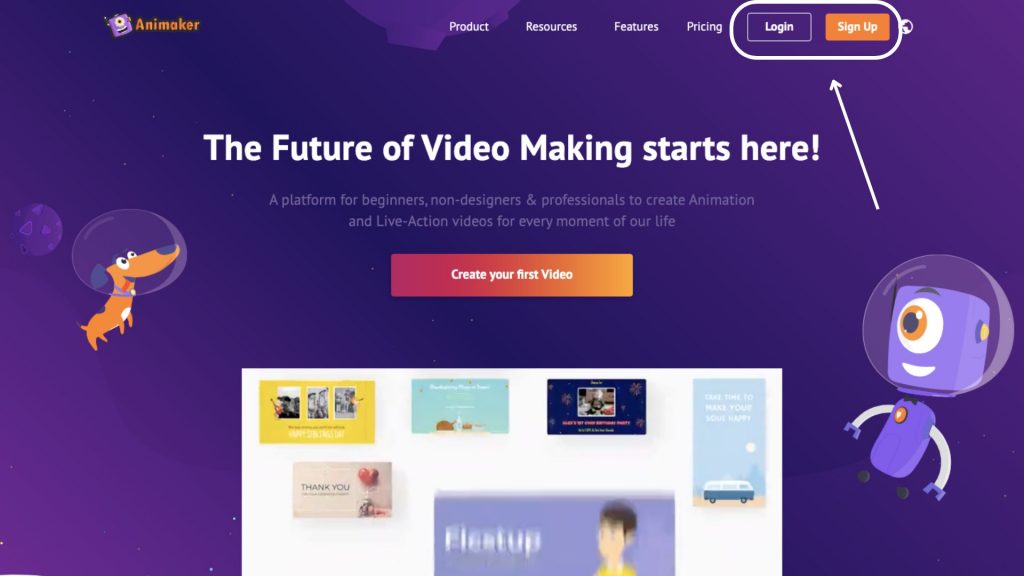
First, Log onto Animaker or sign up if you’re new!
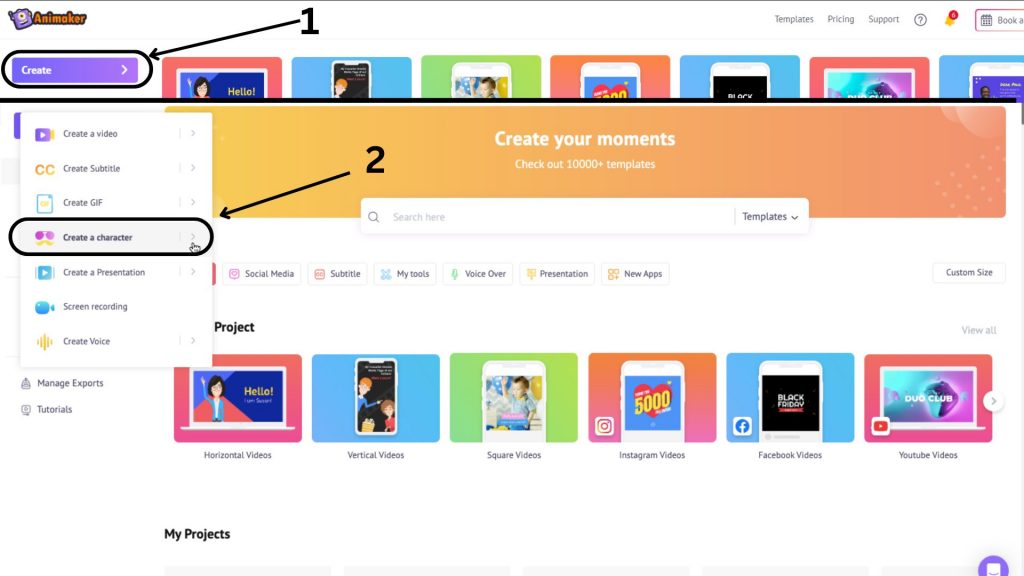
You will now be taken to the dashboard. Click on Create > Create a character.
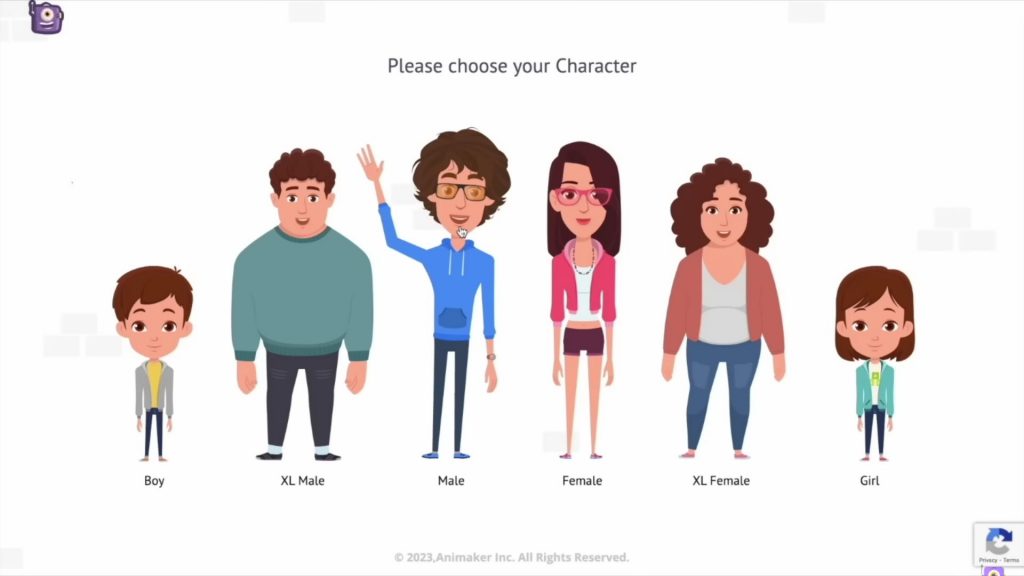
The character builder will open in a new window. The diversity of the many options available, from kids to plus-sized characters, makes creating videos fun and exciting. From the bunch of options, select a character to begin with.
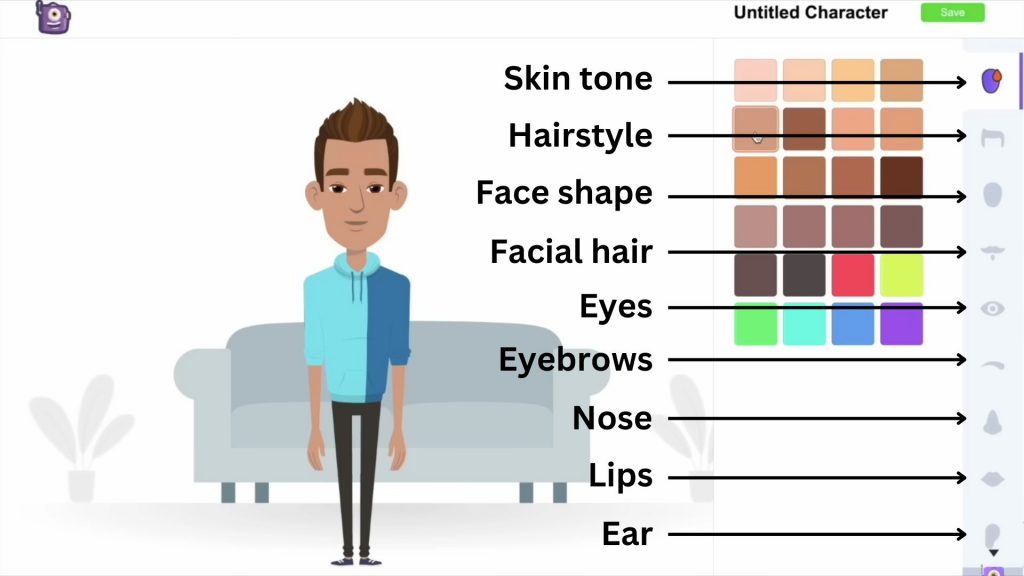
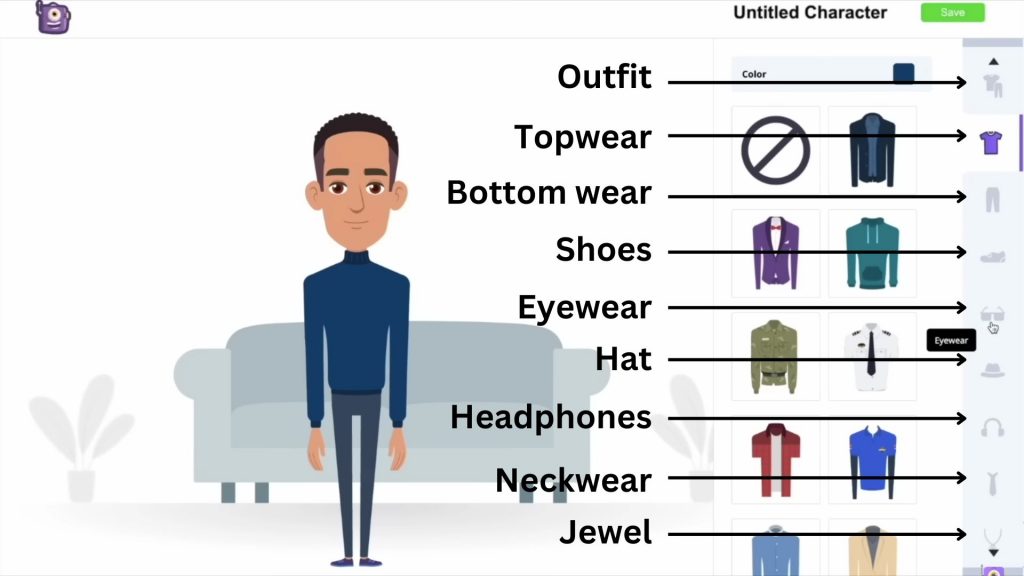
Then, you can start customizing the character by choosing a skin tone, hairstyle, facial features, attire, and accessories.
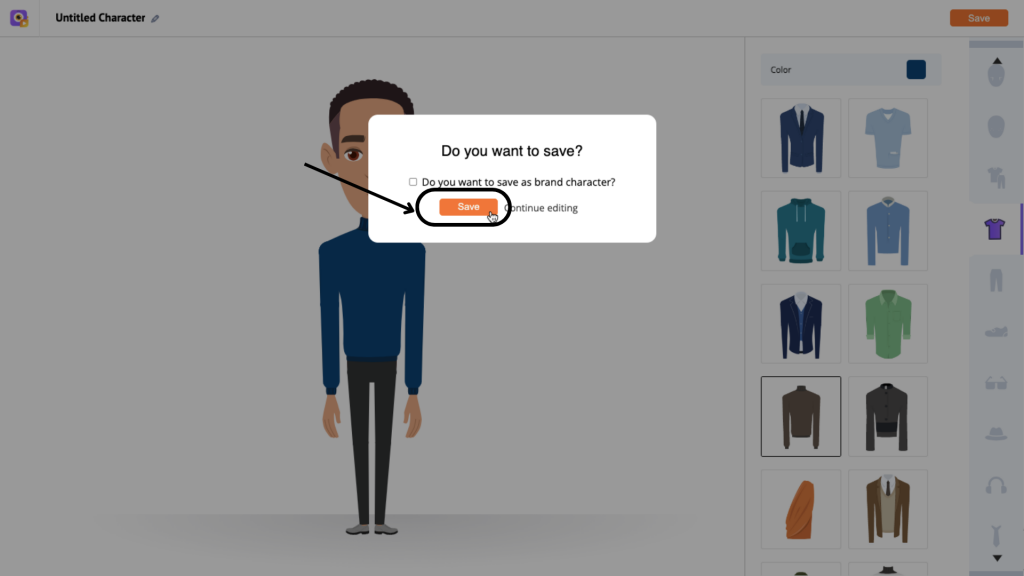
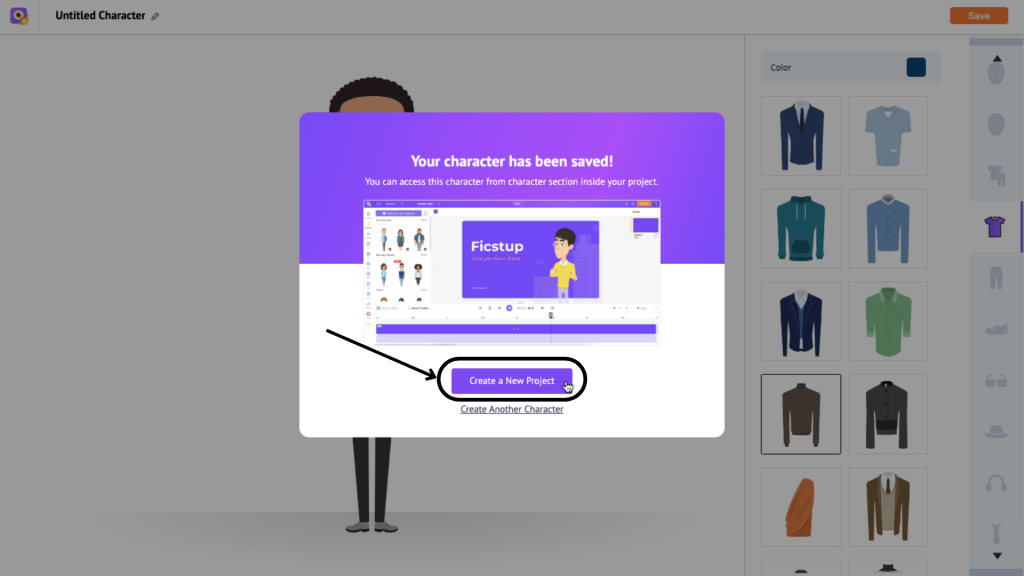
Once you’re done customizing your character, save it by clicking on the option above.
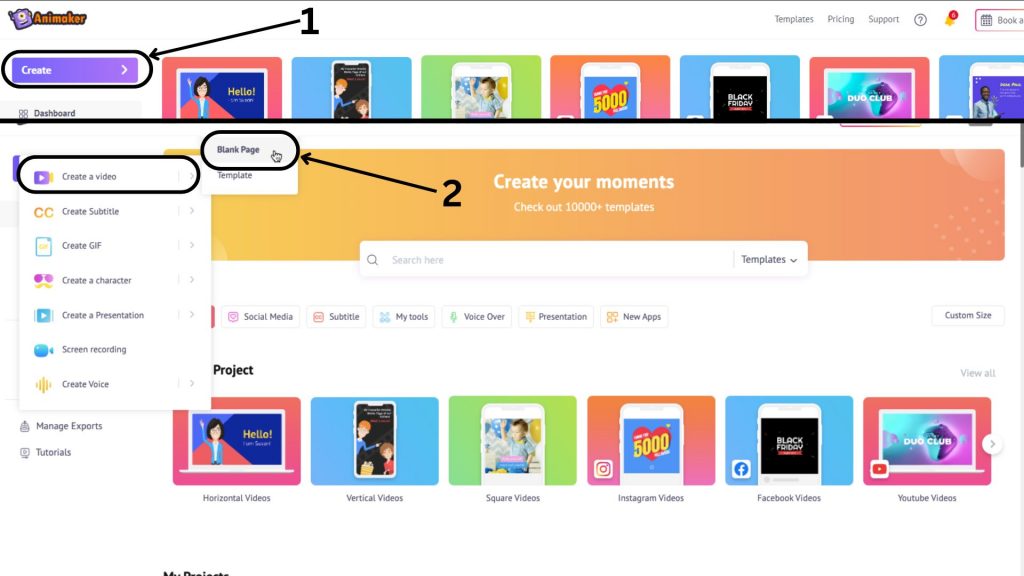
Then click on Create a New Project option. This will take you to the templates page.
Once you are in the templates page, click Create a blank project and select your video size to create a new video project.
A new project will open. Let’s quickly go through the interface.
In the center is the workspace, where you can work on your video. On the right, you will see the scenes section, which allows you to manage and organize your scenes.
The library is on the left, where you can access thousands of assets, characters, templates, etc. Above the workspace is a menu bar offering additional options and tools. At the bottom, you will find the timeline to adjust your video and its assets to precision.
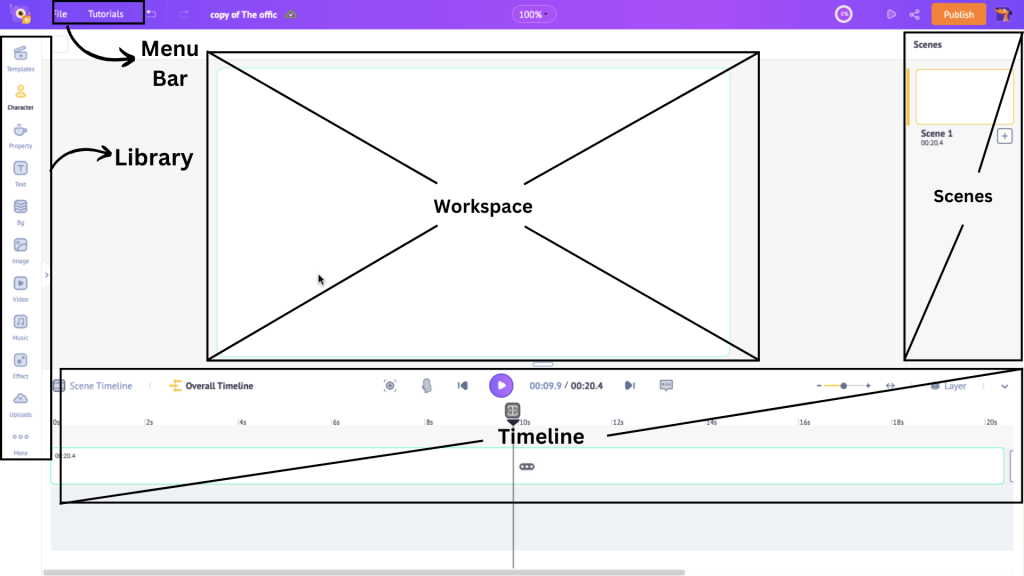
Now that you understand the interface well, let us create the video.
The character library remains open by default when a new project window opens.
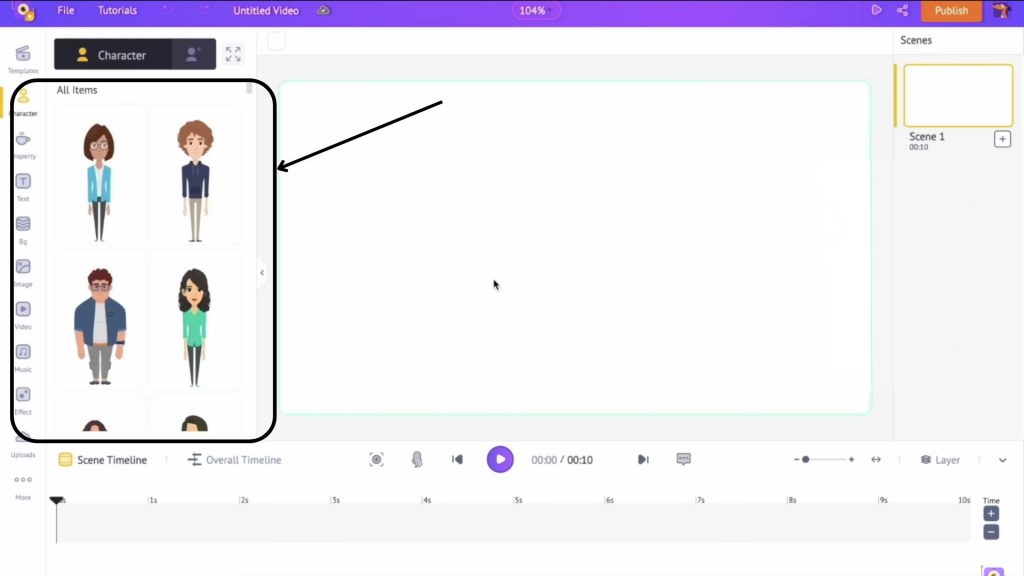
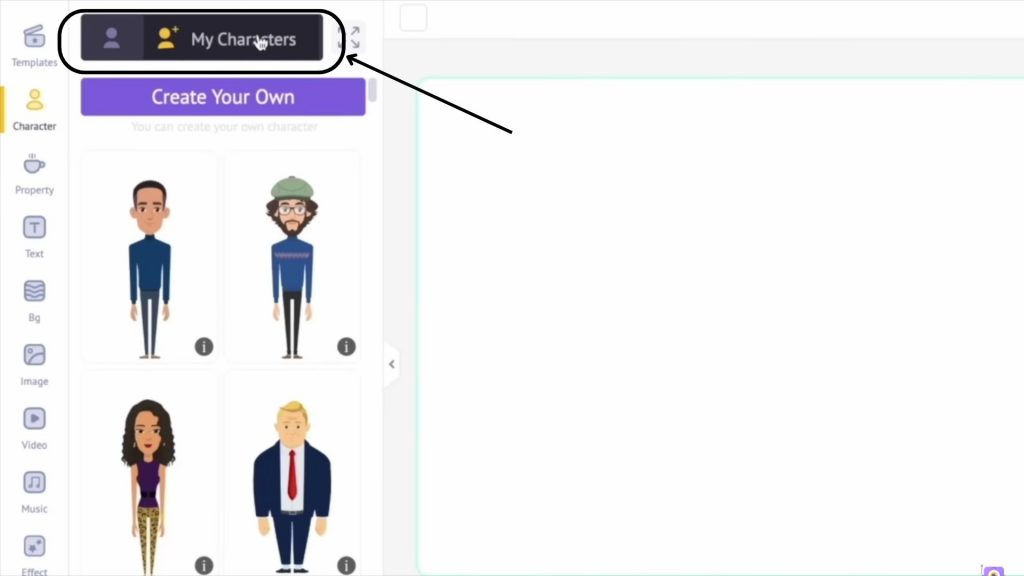
However, let’s use the custom character we created earlier for this video. To access that character, open the My Characters section in the library. Click on the character to add it to the video.
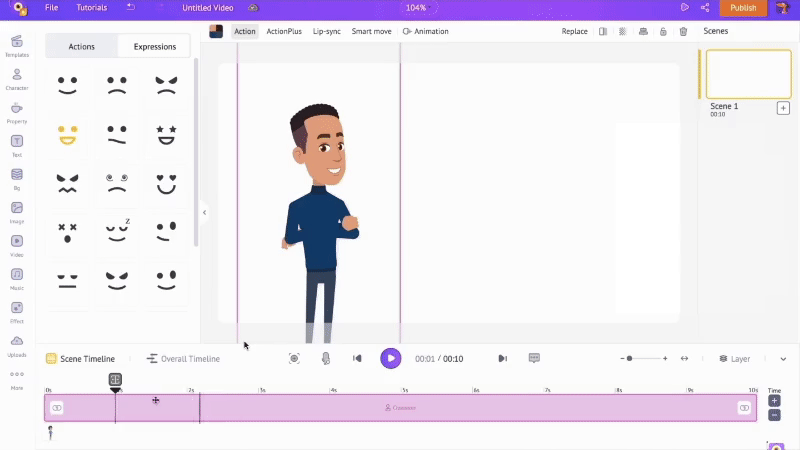
Once the character is added to the workspace, you can see the list of actions on the left. Choose an action from this list by clicking on it.
I want an action that shows the character standing with his hands folded. So, I search for it in the search bar and click on the action I like.
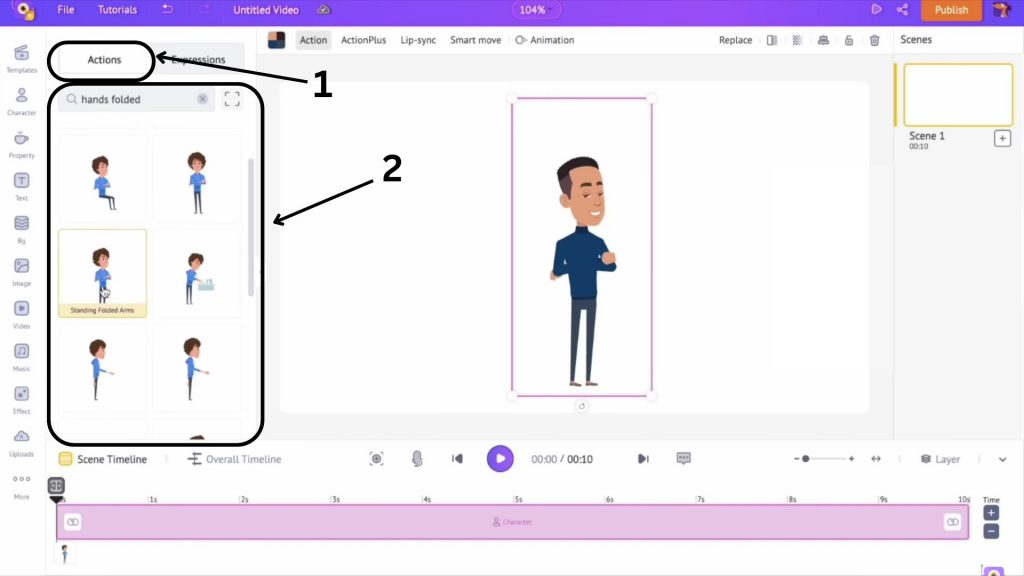
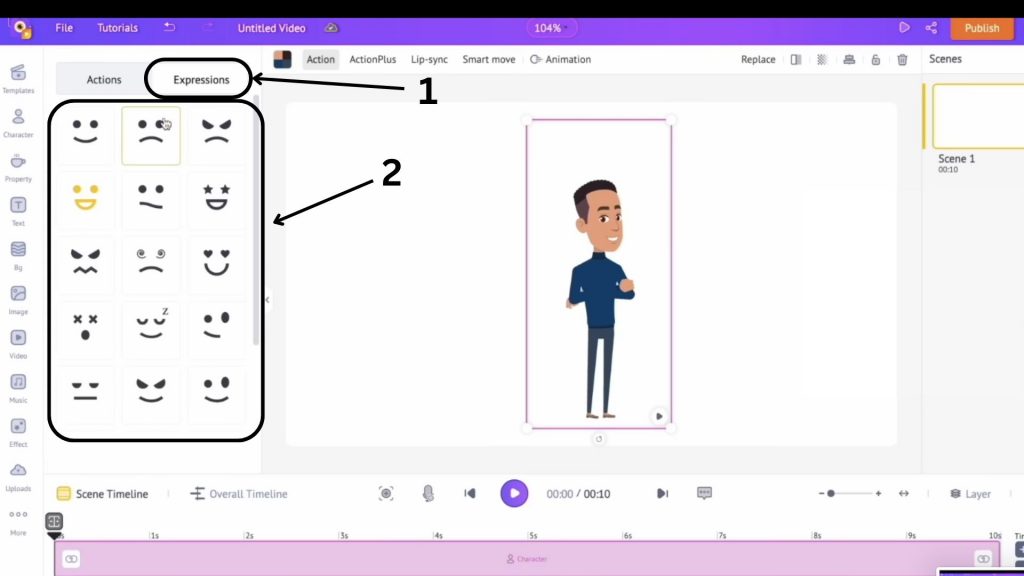
You can also choose an expression for the character from the Expressions tab.
Then, position the character where you want on the workspace. In the scene timeline below, you can see a highlighted bar appear once the character is added. You can adjust this bar to control the character’s visibility in the scene.
Suppose you want the character to appear after the first second. For that, you need to drag the bar's left edge and keep it around the first second of the scene. You can also adjust the other edge to alter the character’s exit in the scene.
Or, if you want the character to appear throughout the scene, then simply drag the edges of the bar to the ends so that the highlighted bar is seen throughout the scene timeline.
We have successfully added the character. Now, let us continue to add life to the video.
2. Add background to the video
The scene looks dull and empty, with just the character standing in a white space. Let's make it better by adding a background to the scene.
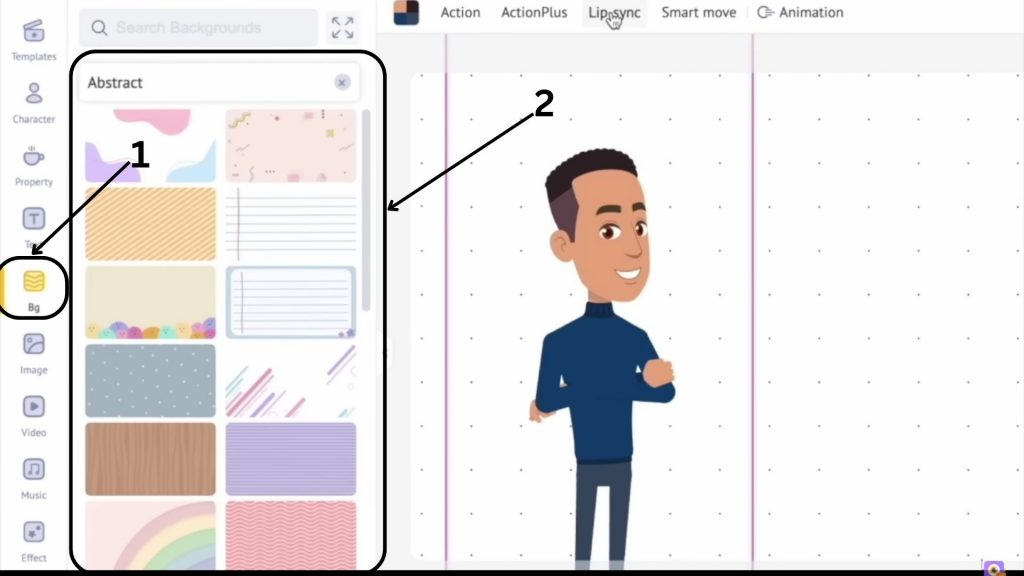
To add a background, open the Bg section of the library. Here, there are five different types of background options, namely solid colors, gradient colors, 2D, image, and video. From so many options available, select a background.
Once you click on a background, it will get added to the scene.
With the background added, let us move on to the next step.
3. Add voiceover to the character
Now that the background is added, let’s move on to the next step. The character has an action and expression added, but it also needs to talk to have a lasting effect on the audience. So, let us add a voice-over to the character.
To do that, click on the character. You will see a bunch of options appear above. Click on the lip-sync option.
This will open three more options to add a voice-over - Record voice, text to speech, and upload.
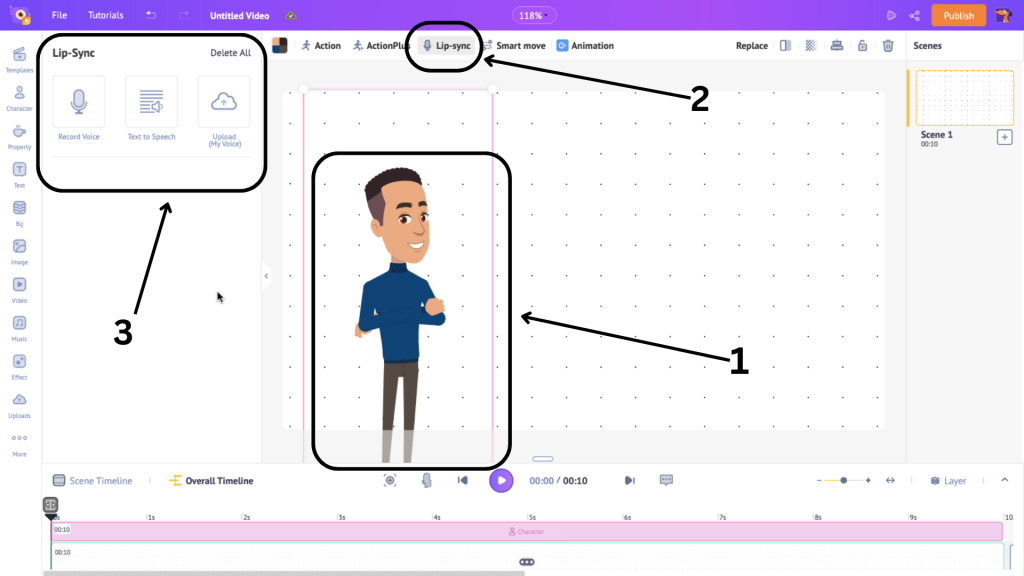
- Record voice - Use this option to record your voice and add it to the character.
- Text to Speech - Use this option to convert text to speech with Animaker’s AI-powered voice generator.
- Upload - Use this option to add an existing voice-over recording.
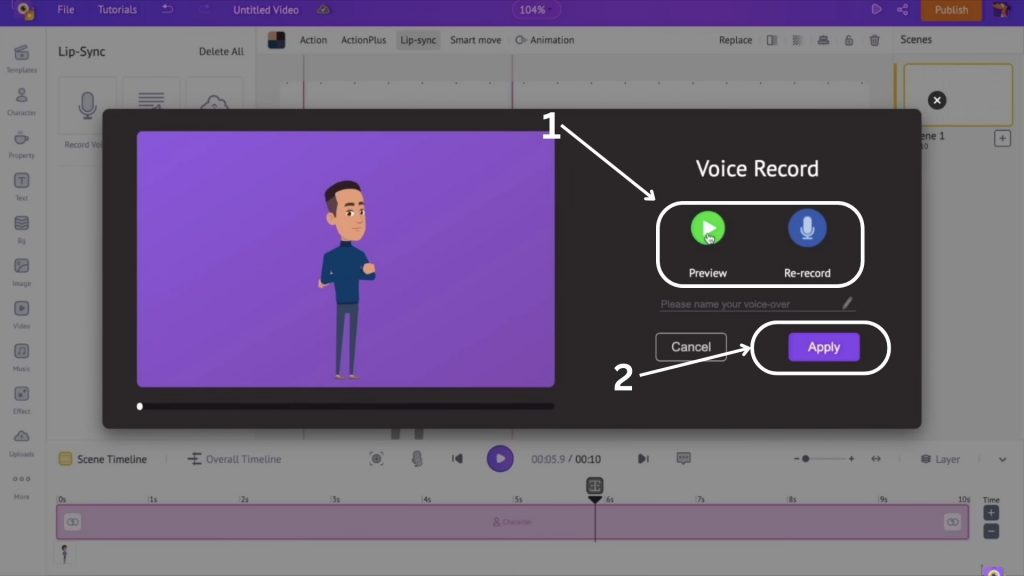
Let’s see how to use the voice record option first. Click on the “Record voice” option. This opens a new window with a microphone icon. Click on the microphone icon to record your voice.
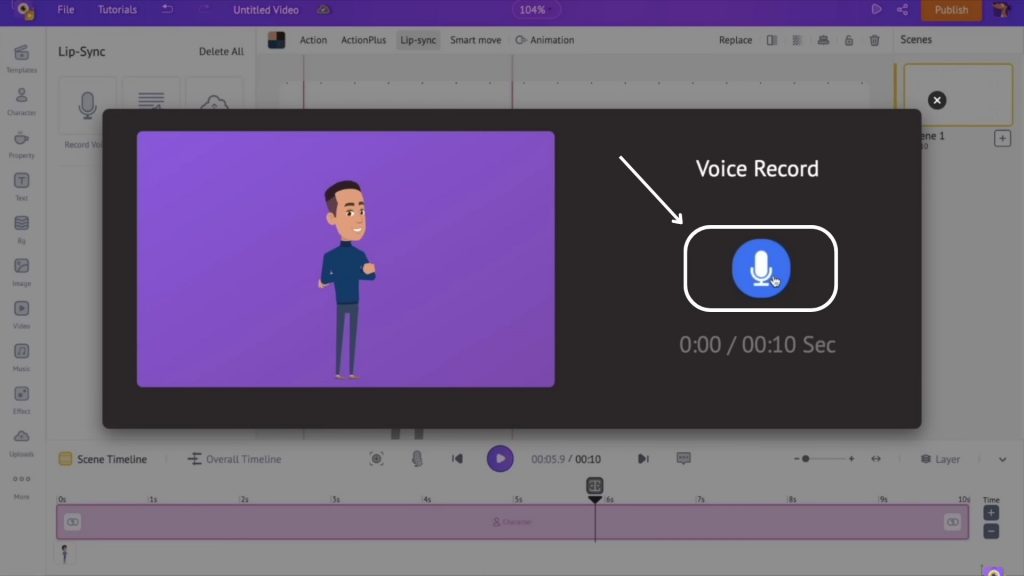
You can then preview the recorded voice and re-record it if need be. Then click on apply to add the voice to the character.
Now, let’s see how to add an AI voiceover using the Text to Speech option.
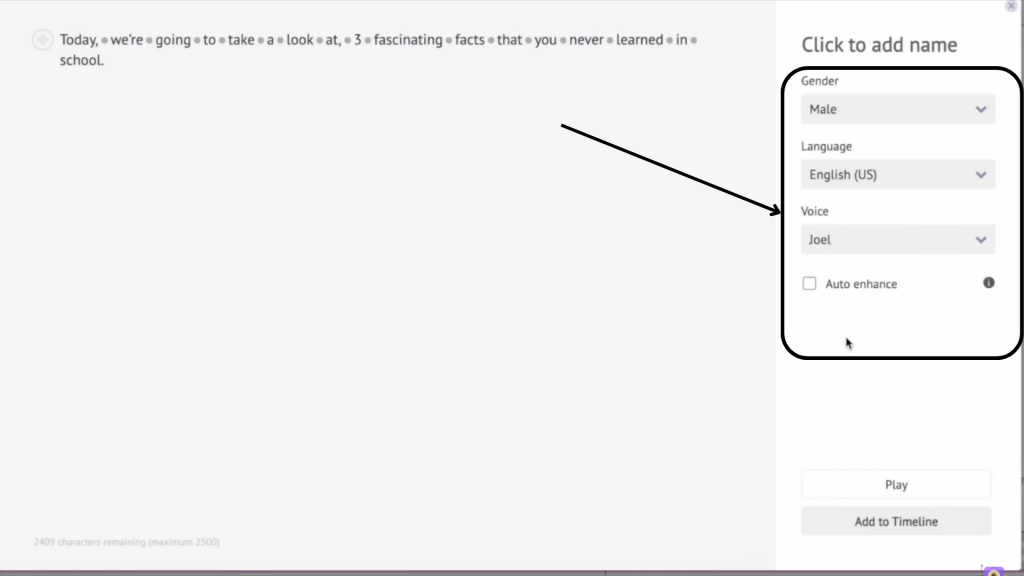
Click on the Text to Speech option and paste a part of the script that was generated earlier.
On the right, there are options to customize the voice-over, like gender, language, and voice.
You can further change the voice and make it sound human-like by controlling the speed, pitch, and volume. You can also add breaks and breaths by clicking on the dots between words.
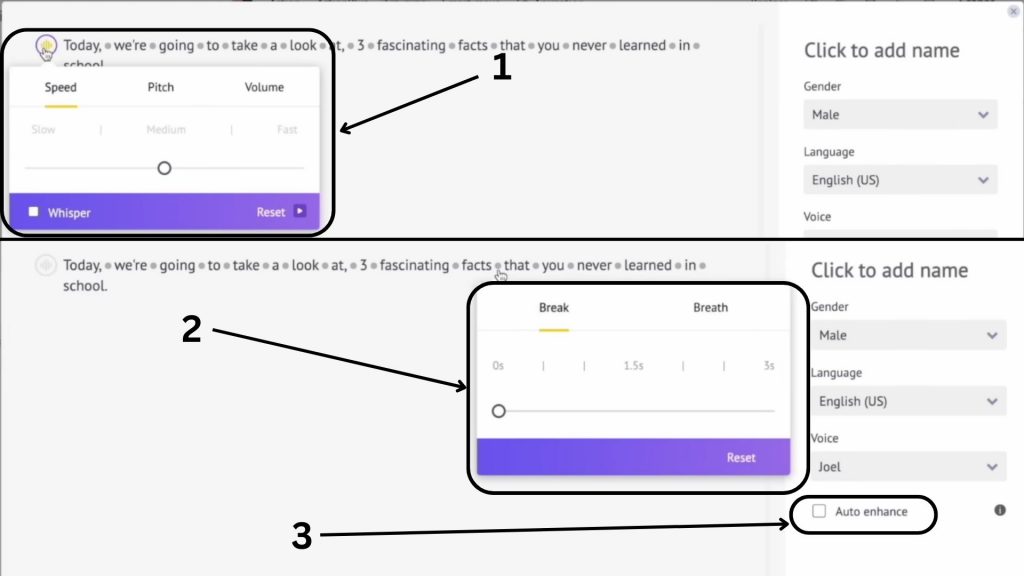
If you don’t want to go through the struggle of making these adjustments yourself, you can simply check the auto-enhance box. This would do the job of enhancing the voice for you. [Note: Auto-enhance feature is a premium feature.]
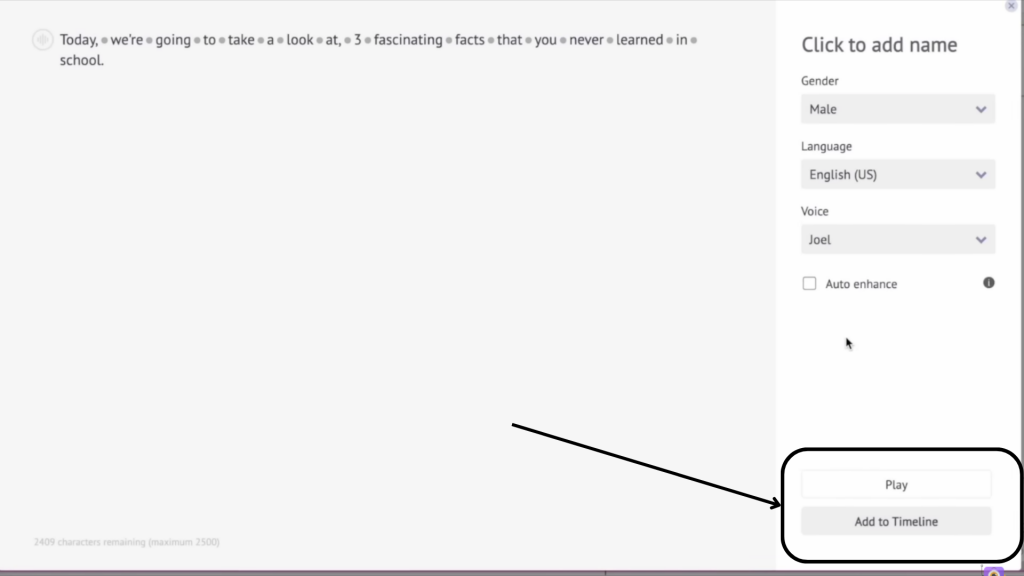
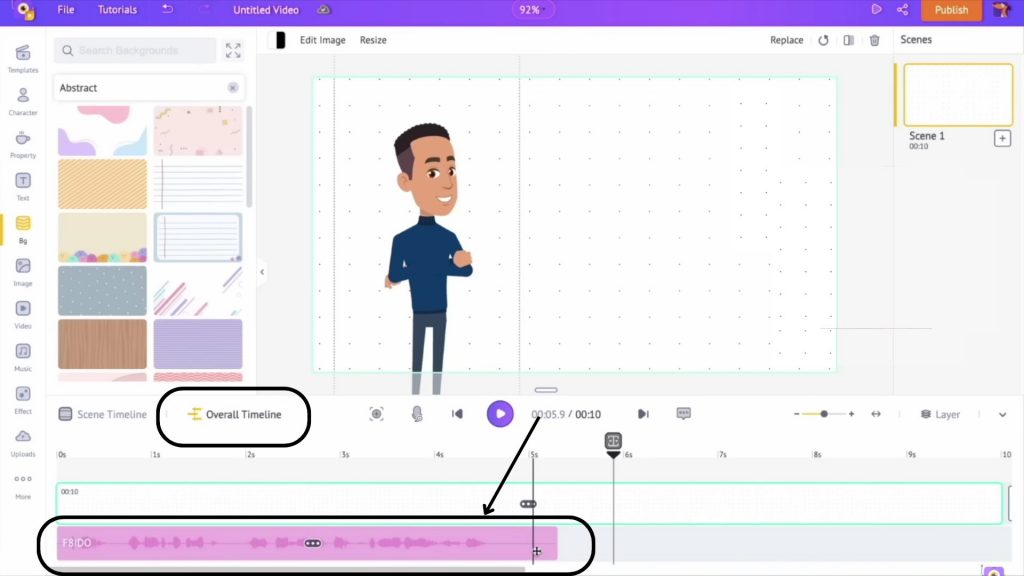
After customizing the voice, you can preview it by clicking play. Click on the Add to timeline option if you like the voice-over.
You can see the voice-over on the overall timeline when it is added. Use the scene/overall timeline to adjust its position in the video.
Next, let’s add some properties to the scene.
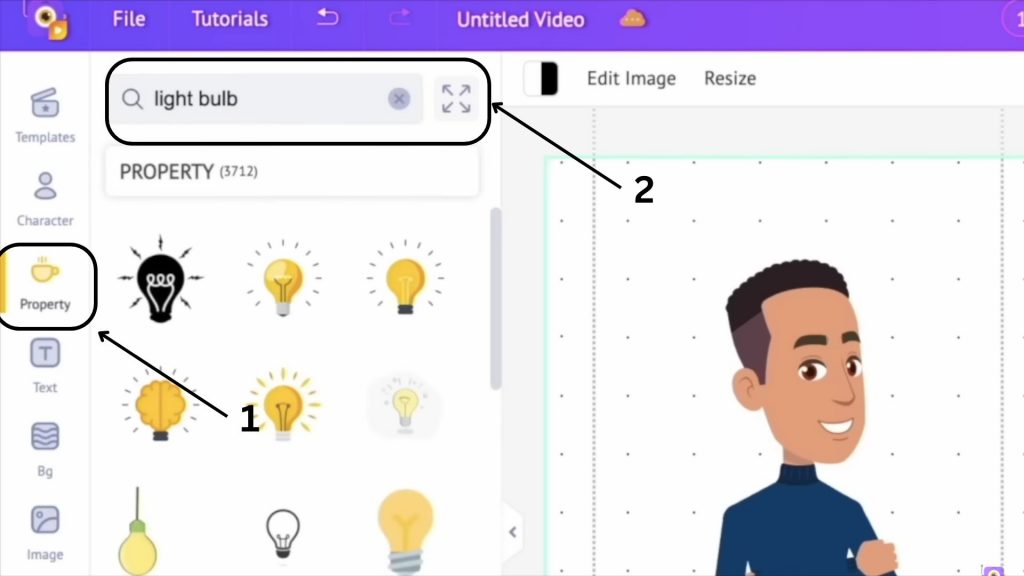
4. Add Properties
It is now time to add some properties to the scene. To do so, click on the property section of the library. From 70k+ properties available, you can search for a particular prop using the search bar or choose one by browsing through the library. I’m going to look for a light bulb to add to the scene. Click on it to add to the scene.
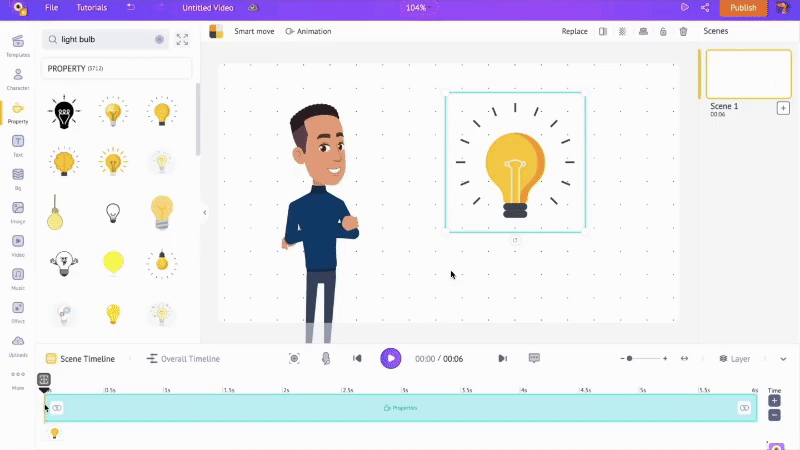
Once added, the property appears on the workspace and on the timeline. Similar to how we controlled the character’s visibility in the scene, you can adjust the visibility of the property by dragging the edges around the time you want it to appear.
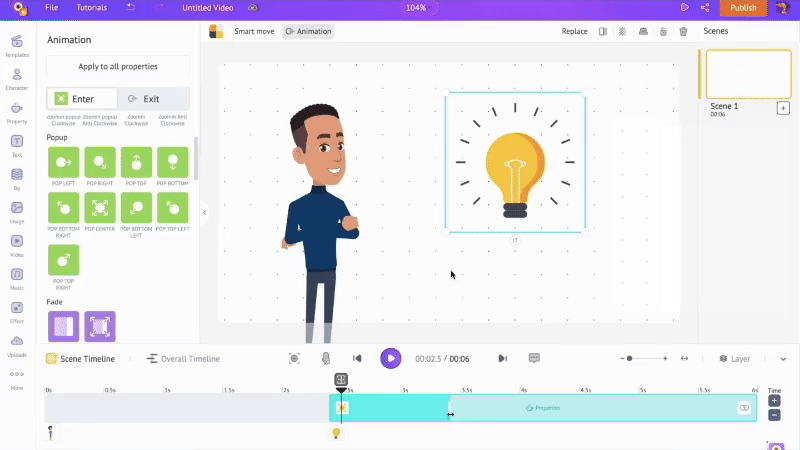
Next, we will add an animation effect to the light bulb. To do so, click on it. You will see the animation option appear above the workspace. Click on it, and the list of animation effects will appear on the left.
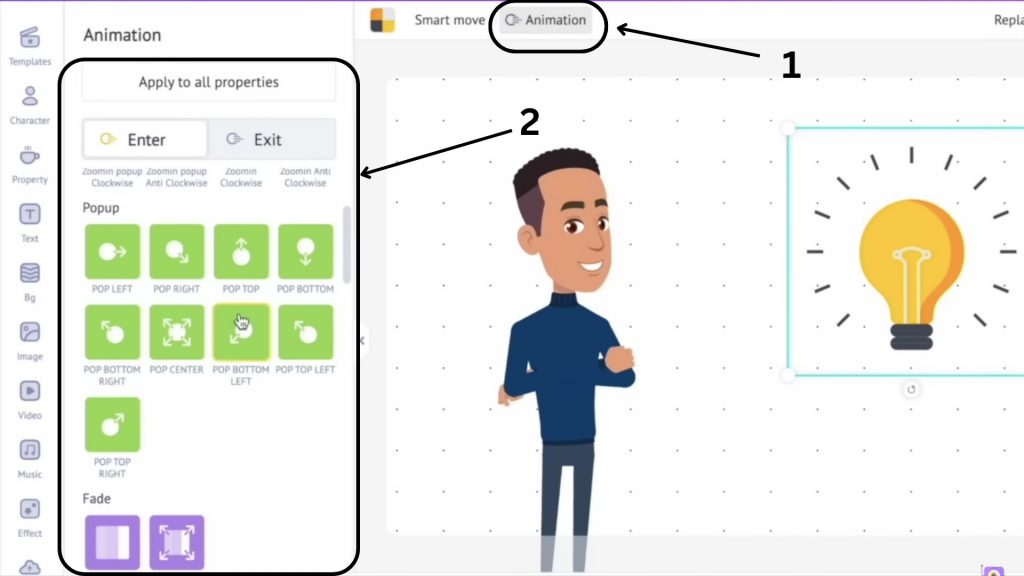
Choose an entry and exit animation effect for the property.
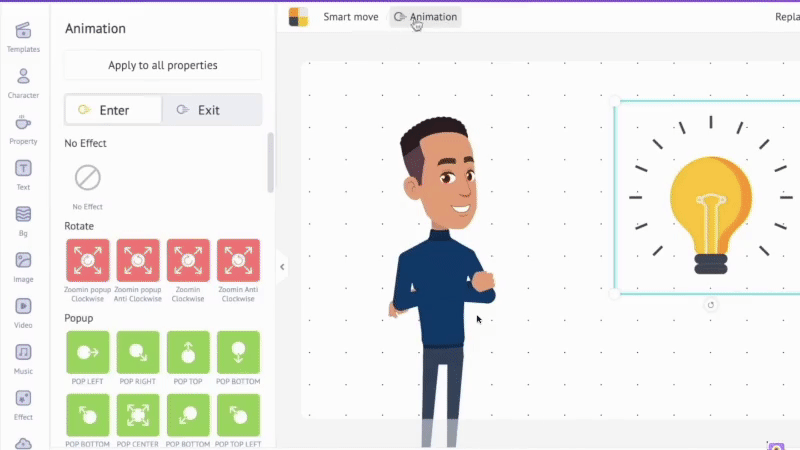
Once you click on the effect, a highlighted part will appear on the timeline. This highlighted part represents the animation of the property. You can control the animation's duration by dragging the highlighted part's ends.
You can then quickly look at your changes by previewing the video again. If you feel everything is good, add another scene to continue making the video for the rest of the script. To do this, click the plus icon in the scenes section on the right.
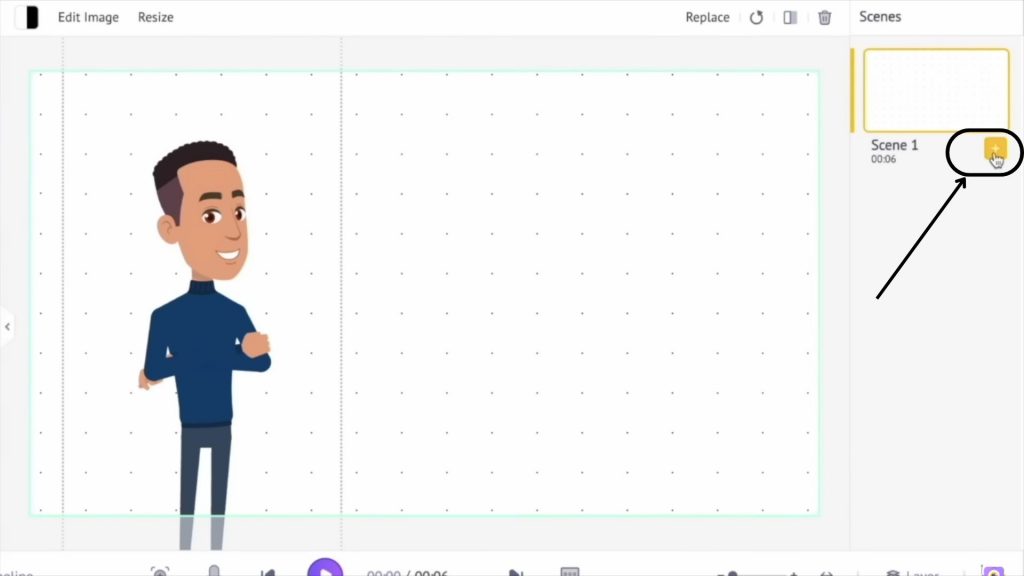
This will add a new scene to the video with the default duration of 10 seconds. You can adjust the scene duration by clicking the plus and minus buttons on the scene timeline. This will increase and reduce the duration by one second.

We can repeat the same steps we did for scene 1 by adding our character, choosing an action for it, and adding the voice-over. Repeating the exact text to speech process, you can add the next part of the script and customize the voice like the previous scene.
You can then add a new background and property and animate the property if needed. Also, don’t forget to adjust the duration of the scene to your liking.
Repeat the same process over and over again until you finish creating the video for the entire script. Let’s move on to the next step.
5. Add transitions
After the previous step, the video will have all the required scenes. However, the transitions between the scenes are abrupt and amiss. So, to fix this, we need to add transitions between scenes. To do this, click the add transition effect option present between the scenes.
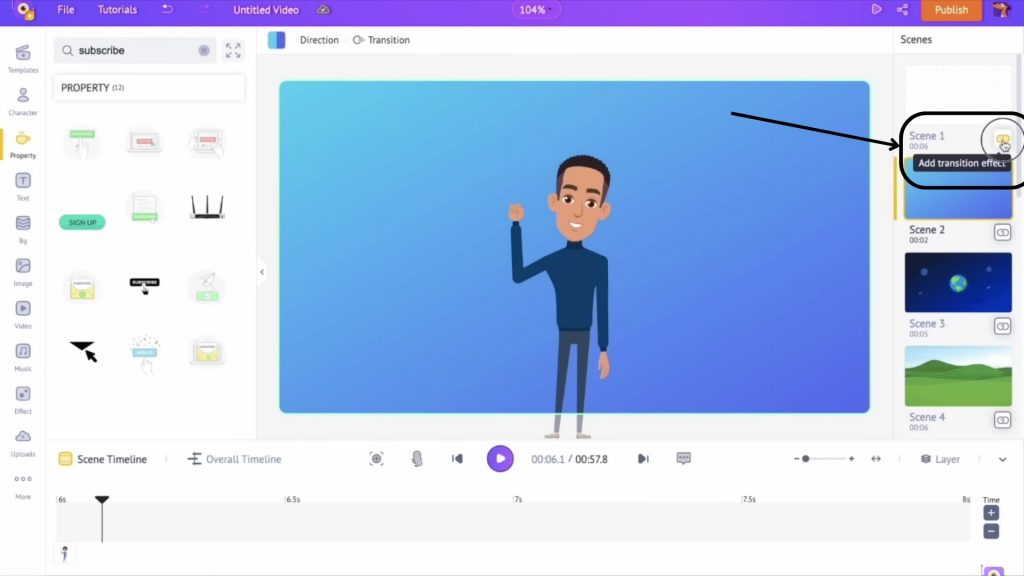
This will open a list of up to 100 transition options on the left. Select a transition effect for each scene individually. Or you can also choose a transition effect and use the Apply to all scenes option to apply the same effect to all scenes.
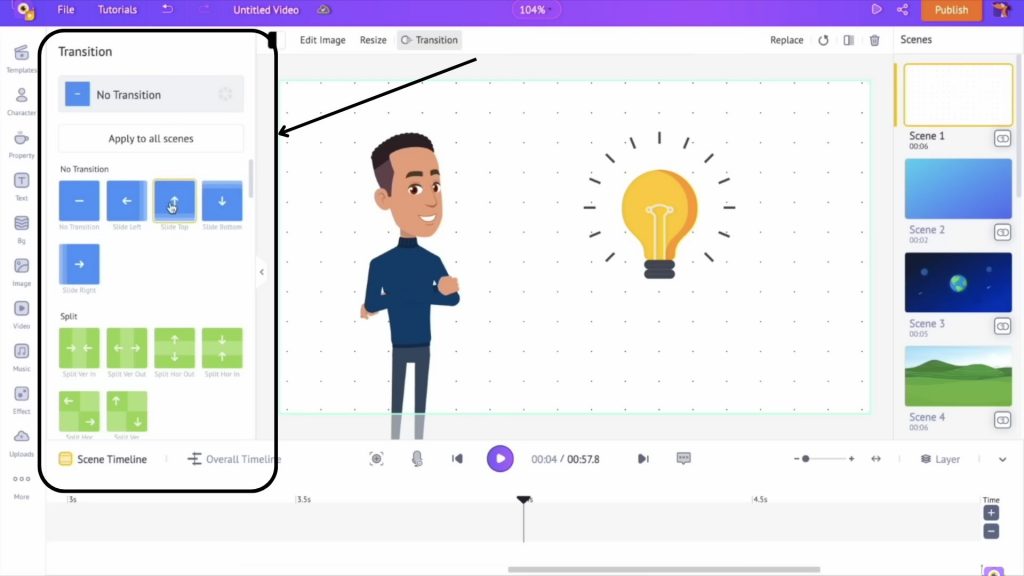
Once the transitions are added, we can move on to the next step.
6. Add music
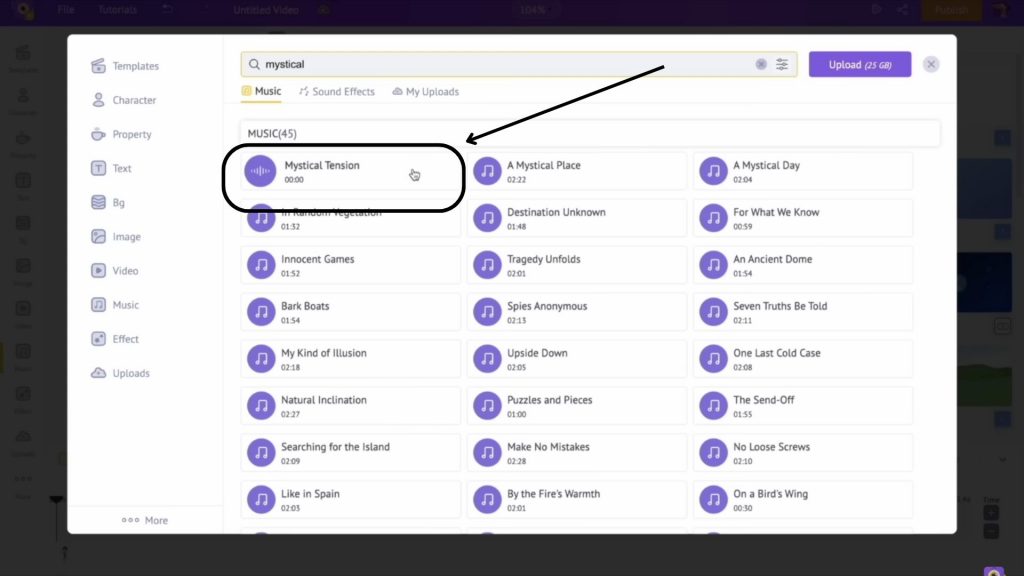
We now have a video with a character stating facts. To elevate the video, it needs a music track in the background. To add a music track, click on the library's music section on the left.
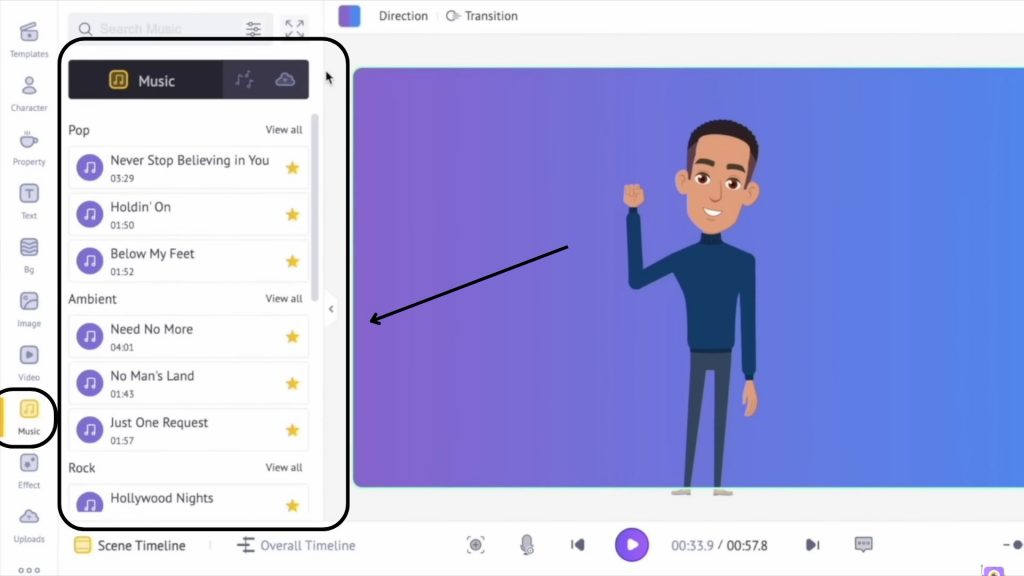
This will open 30,000+ copyright-free music track options for you to choose from. You can preview a track by hovering over it. To add it to the video, click on it.
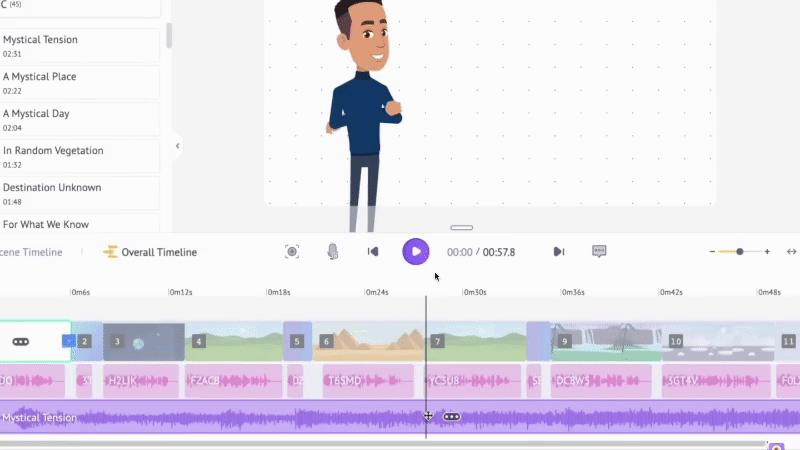
Once you add a music track, you need to adjust its volume to not overpower the voice-over audio. To do so, right-click the track and adjust the volume slider.
Now that the scenes, properties, transitions, and music are added, you can preview to see all the scenes together.
If you’re satisfied with how the video has turned out, you can download it by clicking the publish option and choosing the download video option.
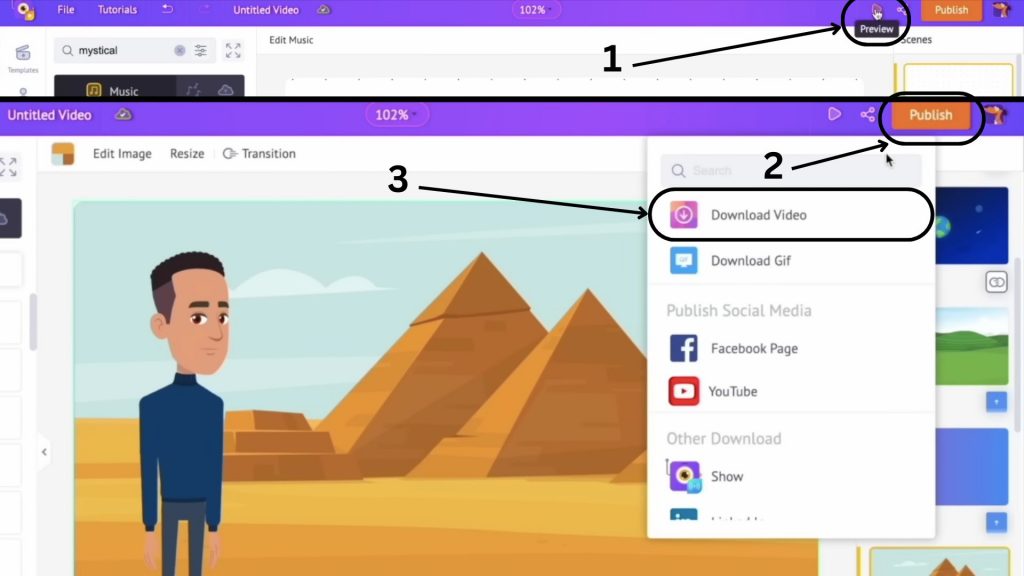
This will redirect you to the exports page, where you can download the video.

7. Add subtitles
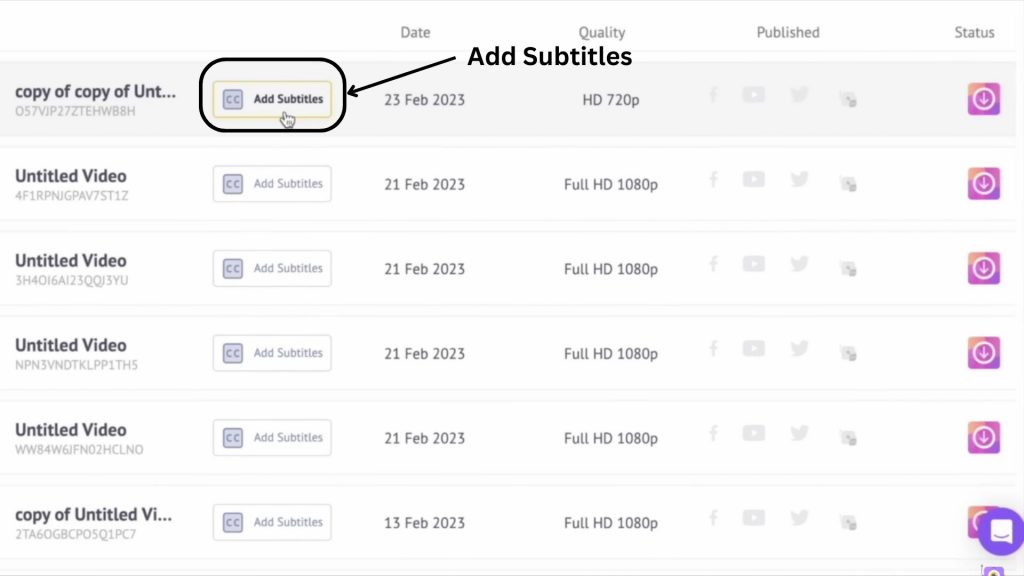
The exports page will show you the progress of your video getting ready for download. Once it is ready, you can download it. You can also choose to use the Add subtitles option to make your content more accessible.
To add subtitles to the video, Click on the add subtitles button.
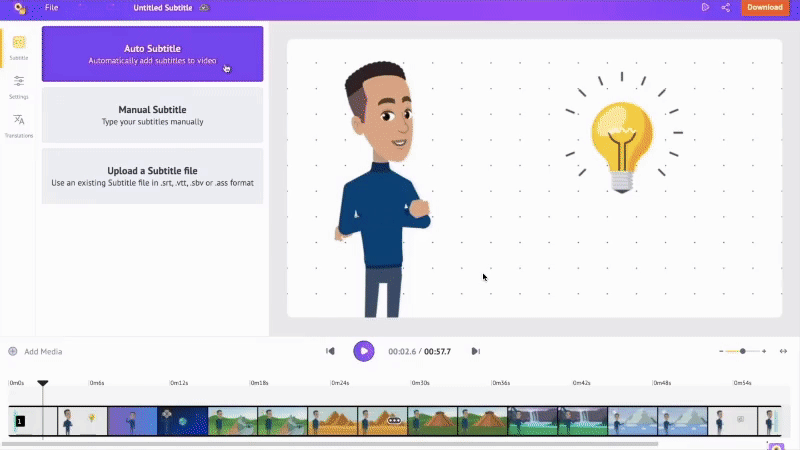
The AI-powered subtitle generator will open in a new window.
You can see three options on the left to add subtitles - auto subtitle, manual subtitle, and upload a subtitle file.
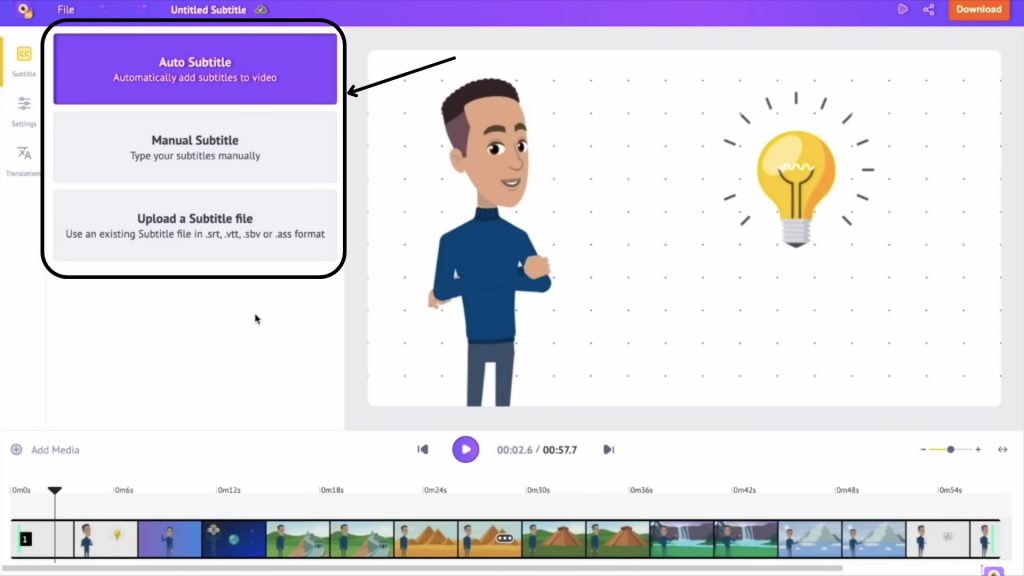
- Click on the manual subtitle option to type out subtitles on your own.
- Click on the upload a subtitle file option if you have a subtitle file.
- Click on the auto subtitle option if you want the AI to generate subtitles.
Here, we will use the auto subtitle feature. Click on it, and it will take up to a few seconds to analyze the audio track and add subtitles to the video.
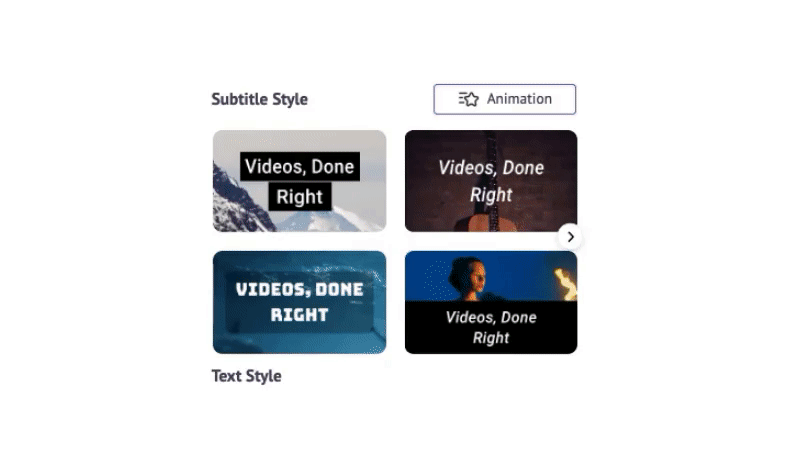
Once the subtitles are added, you can edit the subtitles on the left. You can also customize the subtitles by clicking on the Styles tab on the left. Here, you can change the font style, size, color, alignment, etc.
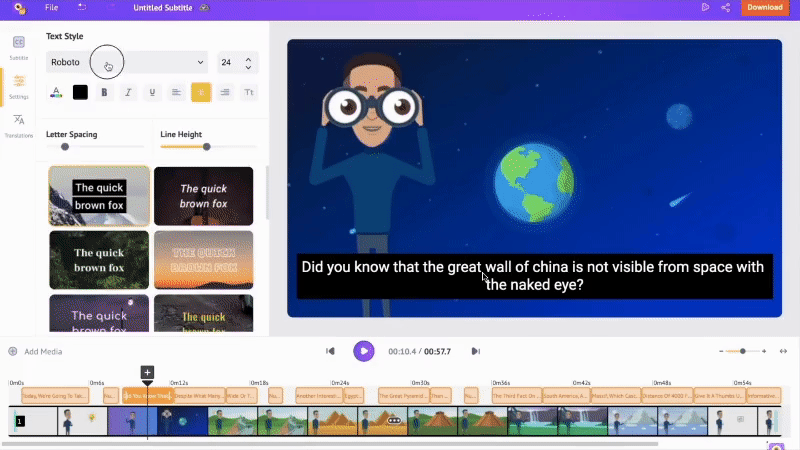
You can also choose a style for your subtitles.
To know more on how to add subtitles, check out the link provided.
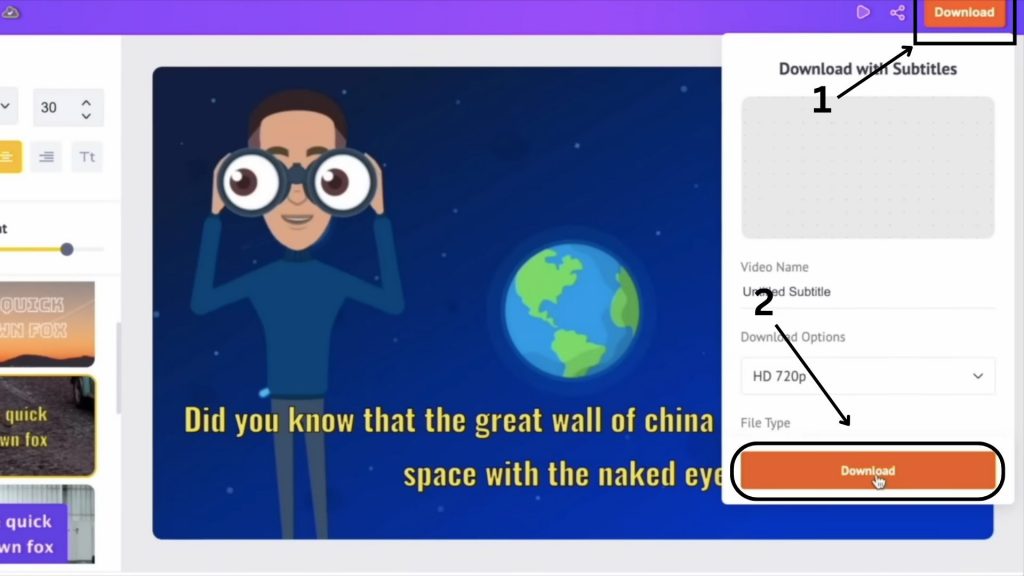
Step 3: Download the video
With subtitles added and customized, all there is left to do is download the video. Click on the Download option, and the video will be ready for download in a few minutes on the exports page.
****
In just 3 steps, we saw how to create a fun AI generated video using ChatGPT and Animaker.
With so many new possibilities available in the AI era, the world of video creation has become limitless, allowing us to unleash our creativity like never before. We can make use of AI tools for business growth, for marketing, and even for content creation.
However, it is crucial to use AI in a responsible and ethical manner that enriches people’s lives.
So, why wait? Head on to Animaker to create your next amazing AI generated video.